Epic PyObjC, Part 2: Adding a Library & Bindings
In the first part of this introduction to getting started with PyObjC on Leopard we created a project in XCode, got somewhat aquainted with InterfaceBuilder, and essentially created a stub of an application that we're now going to start filling out.
If you didn't work through with the first segment, you can still follow along by downloading this zip containing the project. Even better, you can go to the tutorial's GitHub repository which will allow you to see all the changes (gory mistakes included).
First, A Quick Correction
Open up MWController.py and change the line _results = [] to results = []. Afterwards the fields for the MWController class should look like:
class MWController(NSObject):
    tableView = objc.IBOutlet()
    textField = objc.IBOutlet()
    results = []
Essentially, I got bitten by an obvious mistake: the underscore preceeding the method won't play nicely with the translation between Python and Objective C. Perhaps this is a valuable lesson: underscores in method names can have unintended consequences.
As a result, I'd recommend camelcasing your method and function names. For example thisIsAMethod instead of this_is_a_method. Although the method names often look a bit ugly that way, its better then creating a minefield for yourself.
We now return to the scheduled programming.
metaweb.py and NSArrayController
This segment is going to introduce two important aspects of PyObjC. First, we're going to use metaweb.py as an example of using a Python library in a PyObjC project. Second, we're going to get to know Cocoa Bindings.
We'll start out with integrating metaweb.py, which will be surprisingly easy. Explaining Cocoa Bindings and NSArrayController will be a bit more involved, but once you understand bindings you'll be amazed at how quickly you can create complex user interfaces.
Integrating metaweb.py into MetaWindow.app
Before we can get started, metaweb.py does have one prerequisite: simplejson. You can download it on PyPi or with easy_install:
sudo easy_install simplejson
Now that we've installed simplejson, we need to download metaweb.py. Go to the directory where you keep your svn checkouts (I use the ~/svn/ directory, sneakily enough) and check out a copy of the repository:
svn checkout http://freebase-python.googlecode.com/svn/trunk/ freebase-python-read-only
Now open up our MetaWindow project in XCode. To do that you can either open XCode then go to File->Open Recent Projects, or can open the MetaWindow/MetaWindow.xcodeproj file directly from finder1.
Once you have the project open go to the Project menu and then Add to Project.... (If the Add to Project... option isn't selectable, go back to the project window and click on the topmost item in the outline view on the left side, a default application icon labeled MetaWindow, and then try again.)
Then select the freebase-python-read-only/metaweb-py/metaweb.py file and click Add. Next a sheet will popup and give you some options about adding the file to your project. Select the checkbox next to Copy items into destination group's folder (if needed) and then click Add.
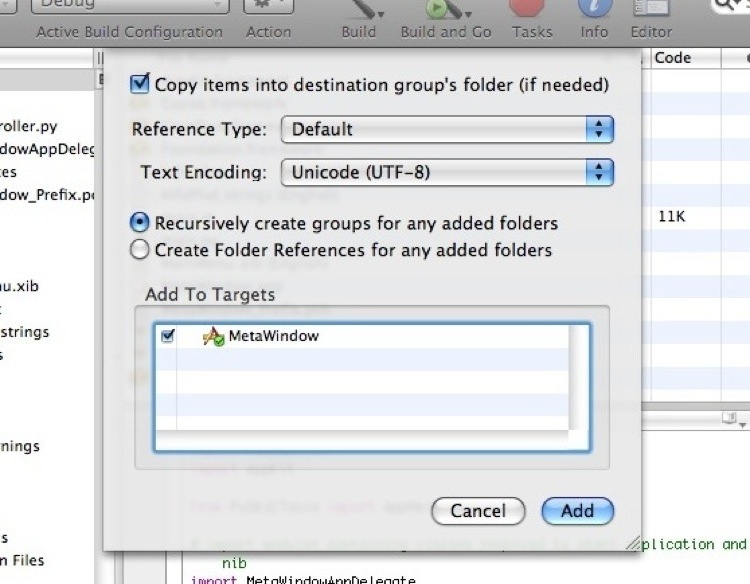
In the project window, drag the metaweb.py file into the Other Sources folder.
On a side note, the folders in the Groups & Files outline view in the project window are logical constructions, not real ones. When you create a folder in the organizer (technically called a 'group') there is no corresponding folder created on the file system. Likewise, when you drag metaweb.py into the Other Sources group you don't actually move the metaweb.py file on the filesystem, simply make it easier to find it within the project window.
Next we need to figure out how to use metaweb.py. My recommendation for getting used to new Python libraries is to always head to the interpreter. So lets go to the MetaWindow directory (which should now contain metaweb.py) and open an interpreter.
>>> import metaweb
>>> dir(metaweb)
['MQLError', '__builtins__', '__doc__', '__file__', '__name__', 'cookiefile', 'cookiejar', 'cookielib', 'credentials', 'cursor', 'debug', 'escape', 'host', 'httplib', 'login', 'loginservice', 'os', 'permission', 'read', 'readall', 'readmulti', 'readservice', 'search', 'searchservice', 'simplejson', 'upload', 'uploadservice', 'urllib', 'urllib2', 'write', 'writeservice']
Hmm. The search function looks interesting, lets take a look at its doc string.
>>> print metaweb.search
<function search at 0x68a070>
>>> print metaweb.search.__doc__
None
Ah, foiled once again. search doesn't seem to have a docstring. Instead lets use XCode to take a look at the search function. Examining metaweb.py at line 375 we find one comment describing search, # Search for topics, which isn't too helpful, but we do find the function definition.
def search(query, type=None, start=0, limit=0):
    # implementation truncated - Will
It looks like search only requires one argument, presumably a string, so lets give it a try.
>>> metaweb.search("Python")
[
 {u'name': u'Python',
  u'image': {u'id': u'/guid/9202a8c04000641f800000000515378e'},
  u'alias': [], u'article': {u'id': u'/guid/9202a8c04000641f800000000002f849'},
  u'guid': u'#9202a8c04000641f800000000002f83f',
  u'type': [{u'id': u'/common/topic', u'name': u'Topic'},
            u"additional types truncated by me - Will"],
  u'id': u'/guid/9202a8c04000641f800000000002f83f'},
  u"additional results truncated by me as well - Will",
]
Yep. That looks like it's what we want. Some structured data that we can put into our table as results for searches. PyObjC can seamlessly (well, there are occasionally a few seams) translate standard Python structures (specifically our old friends list and dict) into Objective-C data structures, so this list of dictionaries is an excellent format for our uses.
If you don't know much about Objective-C data structures, here is a quick crash course. The most common structures are NSArray and NSDictionary. They correspond pretty closely with Python lists and dictionaries, but they have one important difference: they are immutable. Thus, NSArray is actually more similar to the Python tuple, and NSDictionary doesn't have an exact counterpart in Python.
Instead, PyObjC is mapping Python lists onto the NSMutableArray class, and Python dictionaries onto NSMutableDictionary, which are the same as NSArray and NSDictionary except their data can be altered. This pattern exists in many other Objective-C classes, such as NSString and NSMutableString.
Disclaimer: this is glossing over one important distinction, which is that the Python list is a list, and NSArray is an array. This means that the two don't have the same efficiency for many operations. For more on that topic look at the Wikipedia entries for linked list and for arrays.
Now we need to do a couple of things to finish integrating metaweb.py into our application. First we need to open up main.py and add an import for metaweb.py, making it look like this:
# import modules containing classes required to start application and load MainMenu.nib
import metaweb
import MetaWindowAppDelegate
import MWController
After saving main.py, next we need to open up MWController.py to improve upon our stub search_ method.
First, add metaweb.py to the imports at the top of the MWController.py so that it looks like this:
import objc, metaweb
from Foundation import *
And then scroll down to the definition of the search_ method.
What we want to do is take the current value of the textfield, send it to the metaweb.search function and store the results in the self.results field. The code looks like this:
@objc.IBAction
def search_(self,sender):
    search_value = self.textField.stringValue()
    self.results = metaweb.search(search_value)
    NSLog(u"Search: %s" % self.results)
We also changed the logging function, so that we can make sure that things are working how we think they are. Go ahead and click the Build and Go button (Apple-Return), and also open up the XCode console (Shift-Apple-R). In the textfield type something and then hit search. You should see the results in the console window.
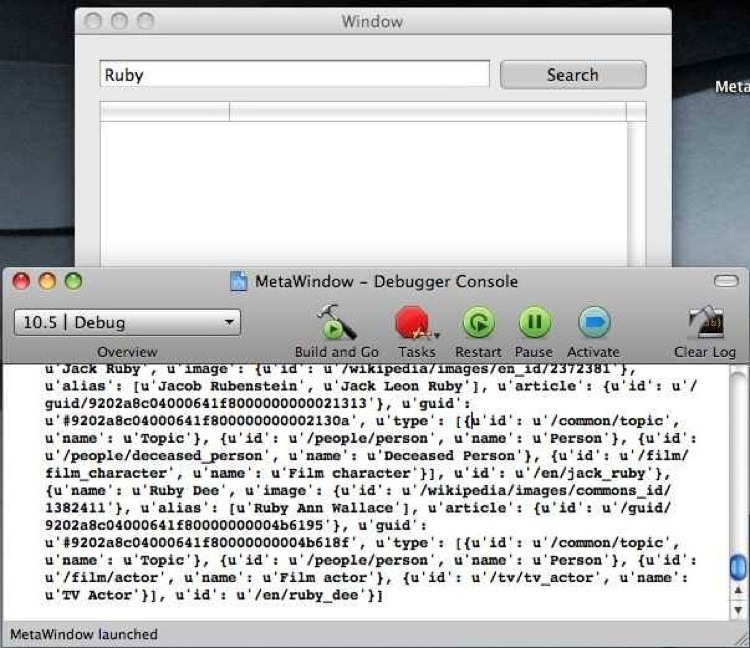
With those simple steps we have integrated metaweb.py into our project. Hopefully that helps to drive home my first principle of using PyObjC: PyObjC is Python. In this next segment we're going to try to drive home the rest of that statement, PyObjC is Objective-C, too, by looking at how we can use Cocoa Bindings to power our tableview with almost no code. (Ahem, I'd probably redact the second half of the phrase to be PyObjC is Cocoa, too. if I hadn't already gone and published it. Ah well.)
Cocoa Bindings 101
Cocoa Bindings were added to Cocoa in OS X Panther. Used properly, bindings help eliminate repetitive and frequently used patterns found in Cocoa applications. Perhaps the most common case (and the one we'll be looking at in a moment) is that NSArrayController can automate the process of using an array to supply the contents of a table view.
Previously, connecting an array to a table view required creating a custom class of your own that implemented the NSTableView delegate and datasource informal protocols. The datasource informal protocol required implementing these three methods:
- (id)tableView:(NSTableView *)aTableView objectValueForTableColumn:(NSTableColumn *)aTableColumn row:(int)rowIndex;
- (void)tableView:(NSTableView *)aTableView setObjectValue:anObject forTableColumn:(NSTableColumn *)aTableColumn row:(int)rowIndex;
- (int)numberOfRowsInTableView:(NSTableView *)aTableView;
And then you had to do implement a number of methods for the delegate informal protocol as well.
Controlling an NSTableView that way wasn't hard--just a bit tedious--but after the fourth or fifth tableview you set up you began to feel like there had to be a better way.
Cocoa bindings are that better way. You create a few objects in InterfaceBuilder, connect some IBOutlets together, maybe throw in a few lines of code depending on your application, and you're done.
On a side note, this seems like a nice time for a moderating message: I still use the datasource and delegate method for supplying a tableview's data at times. Cocoa bindings make frequently occuring actions easy, but they tend not to stretch too far when you start doing atypical things.
The more your application's logic and workings deviate from the norm, the more likely you'll eventually find situations where Cocoa bindings can't save you.
On another side note, if you combine Core Data with Cocoa Bindings you can get an amazing amount of functionality for free. This tutorial won't look into that potent combination, but it's well worth your time to investigate as you move forward.
I heartily recommend the CocoaDevCentral article on CoreData and Cocoa Bindings as a starting point. It is implemented in Objective-C, and is from the OS X 10.4 era, but it's a great introduction nonetheless.
In addition to NSArrayController there are a handful of other similar controllers: NSObjectController for objects, NSDictionaryController for dictionaries, NSTreeController for tree data types, and NSUserDefaultsController for user defaults. Each of them combines with Cocoa Bindings to make your life a bit easier.
At first you may have to force yourself to use them--Cocoa bindings certainly have something of an unkind learning curve--but mastering them will make you happier and more productive.
Creating An NSArrayController
Now we're going to take our first step into using Cocoa bindings. From the XCode project window double click on MainMenu.xib (English) to open it for editing in InterfaceBuilder.
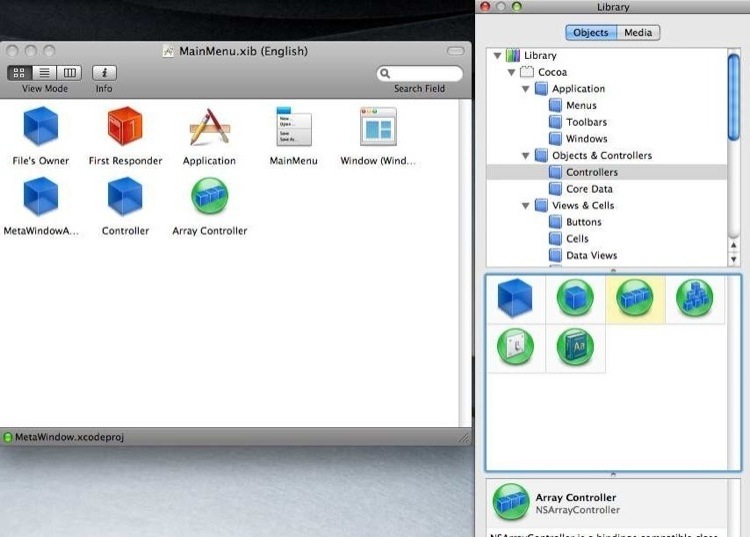
We're going to create (instantiate being the proper term) an instance of NSArrayController. Find it in the Library window and drag it into the MainMenu.xib (English) window with all our other instances.
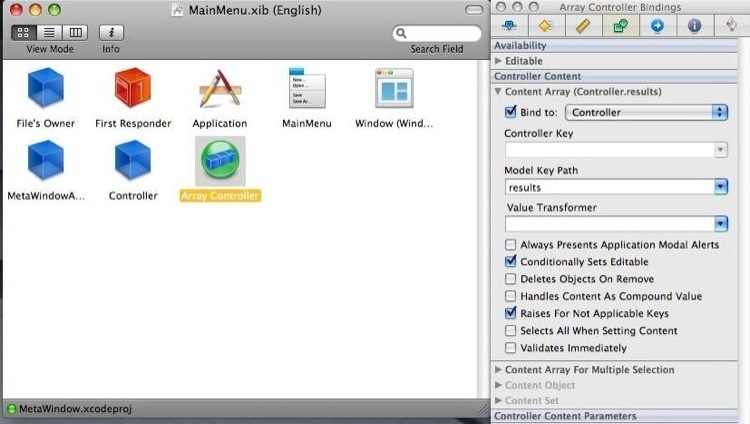
Then open the Inspector (Shift-Apple-i), select the new instance--Array Controller--that we just instantiated, and click on the fourth tab in the Inspector (named Bindings). Click on the arrow next to Content Array and select Controller in the drop down menu text labeled Bind to:. Then for Model Key Path type in results. There shouldn't be a value for the Controller Key or Value Transformer fields.
Now click on the first tab in the Inspector. We're not going to change the values here in this tutorial, but notice it's assuming we're going to be using NSMutableDictionary as the base class for the object in the array. In other words, that the array controller is configured to represent an array of dictionaries. If that wasn't the case (in an application of your own, somewhere down the road), you'd want to change that setting.
Filling Our Tableview: The NSTableView Itself
In InterfaceBuilder, click on the NSTableView inside of the Window (Window) window. In the Inspector you'll notice that your first click on the table view will actually select the NSScrollView that contains it, so you will then need to click on it again to select the NSTableView inside of it (you can tell which is selected by looking at the title of the Inspector window).
Then click, a third time, on the first column inside of the table. Once you have the NSTableColumn selected (you'll know by checking the title of the Inspector) go over to the bindings tab in the Inspector. Click the arrow next to Value (the first option at the top).
Next to Bind to: select Array Controller, leave Controller Key as arrangedObjects, and in Model Key Path type name.
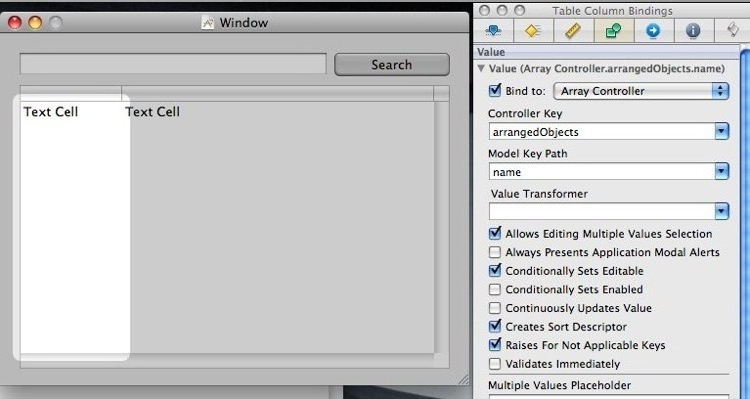
Then do the same for the second column, but for Model Key Path you should use the value article.id.
Save, and take heart because we're very close to finishing up this segment. Really, really close.
One More IBOutlet For MWController
Go back to XCode and open up MWController.py. In the MWController class definition add another IBOutlet, this one named arrayController. After that change the beginning of the MWController class should look like this:
class MWController(NSObject):
    tableView = objc.IBOutlet()
    textField = objc.IBOutlet()
    arrayController = objc.IBOutlet()
    results = []
Now go back into InterfaceBuilder and click on the Controller object in the MainMenu.xib (English) window. Hold down control and drag from Controller to Array Controller and then release. From the popup menu select arrayController.
Save and then close InterfaceBuilder.
The search_ Method
The last thing we'll do in this segment is rewrite the search_ method. There is one awkard issue to deal with, and it is a result of how Python, Objective C and PyObjC handle memory management.
A brief side note on differences in garbage collection between Python and Objective C.
In Python, memory management is typically completely invisible to the programmer. You create things and keep using them until you're done. Then you stop using them, and thats all there is to it. If an object has a reference to it somewhere, it will stay alive, otherwise it'll get recycled when the garbage collection process next checks on it. Nice and simple.
However, in Objective-C you have to do some memory management yourself2. Typically there are three methods (present in all Objective C objects) used for managing memory: retain, release and autorelease.
Each object has a counter that starts out at zero when it is created, and whenever its retain method is called the counter increases by one. Whenever its release method is called the counter decreases by one, and whenever the counter is zero the object is in imminent danger of being collected by garbage collection.
autorelease is a bit more complex, it means that the counter will be decremented by one at the end of the current cycle. Basically that means you can use an autoreleased object for a little bit, but it won't be sticking around for long.
However, there is one more crucial datum to understanding memory management in Objective C: when you create a new instance of an object, who owns it? Or, to continue with the previous explanation, what is the value of its counter?
It turns out that there is no single answer to this question, but instead a guideline. If you create an object using a method with either init or copy in its method name, then you are responsible for releasing the object (i.e. it has a value of one), otherwise you should assume that the object is autoreleased and will be released at the end of the current cycle without you doing anything.
One final detail, most collections will retain their contained objects until they themself are released or the object is removed from them. Consider this snippet:
NSMutableArray * a = [[NSMutableArray alloc] init];
NSString * myString = [NSString stringWithString:@"PyObjC is good times."];
[a addObject:myString];
Because we created myString with a method that doesn't contain init or copy it will be autoreleased at the end of this cycle, but because we add it to the array the array will retain it, and myString will persist until the array releases it (either when the array is deallocated or when it is removed from the array).
The simple--but unfortunately naive--implementation of the search_ method we desire looks like this3:
@objc.IBAction
def search_(self,sender):
    search_value = self.textField.stringValue()
    self.results = metaweb.search(search_value)
    self.arrayController.rearrangeObjects()
The added line self.arrayController.rearrangeObjects() tells the NSArrayController controlling our NSTableView to redisplay its data. Which is necessary because the data will change after each search.
Indeed this will almost work, but when you run the application it will begin spewing errors about Key Value Observers and objects being released before their due time. The issue is that the NSTableView and NSArrayController do not retain their contents (unlike an NSArray), and the Python dictionary instances are getting lost somewhere in the nether between the two garbage collectors.
A simple solution to this problem is to remake all the Python dictionaries as instances of NSDictionary. Which, fortunately, is just one additional line of code. The working definition of search_ ends up looking like this:
@objc.IBAction
def search_(self,sender):
    search_value = self.textField.stringValue()
    lst = metaweb.search(search_value)
    self.results = [ NSDictionary.dictionaryWithDictionary_(x) for x in lst]
    self.arrayController.rearrangeObjects()
As you move forward with PyObjC, you'll undoubtedly run into the occasional memory management issue that leaves you confused about what is going wrong. This may seem daunting, but these issues are easily dealt with using one of two solutions:
- using an already existing Objective-C class (like we did in
search_), or - subclassing an Objective-C class in Python (even just subclassing from
NSObjectis sufficient).
Okay, we're done editing MWController, so go ahead and save those changes.
Testing It Out
Now click Build and Go to launch the application. Type something into the textfield, click search, revel in the results.
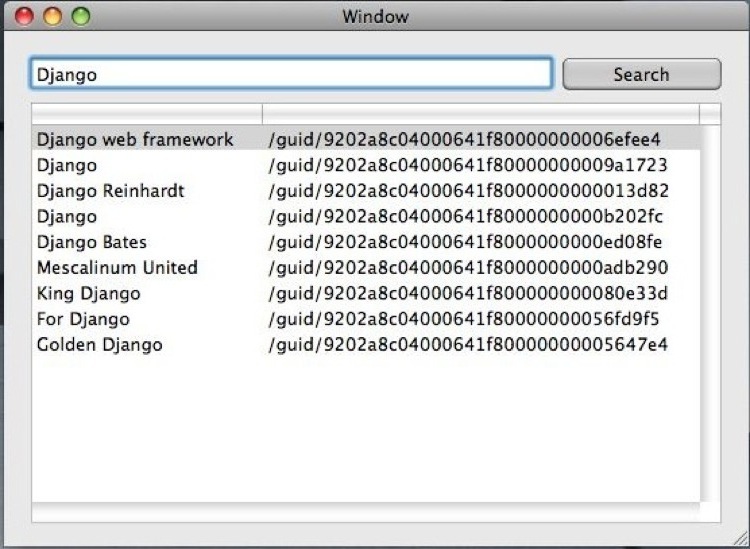
A zip containing the project at this point can be downloaded here, as well as a GitHub repository containing the project code.
We've addressed a lot of content here. In particular, Cocoa Bindings are something you'll have to struggle and play with for a while before they really click. That said, thanks to the power of Cocoa Bindings, we've only needed to write about 15 lines of Python code to get this project this far. Thats a bit impressive.
I'm not trying to be condenscending or anal, just trying to write a tutorial that someone who has never used XCode can follow without needing to ask questions or rely on other resources. My first encounter with XCode, a couple years ago, was also my first encounter with PyObjC, Cocoa and Objective-C as well, so I am attempting to take very little for granted.↩
Although with the introduction of Leopard, Apple has provided a garbage collection framework to provide automatic gc for ObjC, but you'll want to get to know how memory management works in ObjC anyway, since there are situations where you can't use the automatic gc framework for ObjC.↩
I'm avoiding one issue in this naive implementation, and that is it doesn't deal well with incomplete results. For example, some results don't have a
nameand others don't have anarticleorarticle.id. In order to personally experience the failure that comes with using this naive method you will have to weed out or complete the partial results. It turns out that the incompleteness issue simply evaporates when we implement our less naive solution, so I opted to bypass a bit of the complexity involved in writing the wrong answer more correctly.↩