An Epic Introduction to PyObjC and Cocoa
Along with the release of Leopard (OS X 10.5) came the release of PyObjC 2.0 which made getting started with a PyObjC project a snap. However, a fair number of people have remarked that there is not a comprehensive up-to-date tutorial on getting started with PyObjC 2.0 on Leopard.
Having developed Cocoa applications using both Objective-C and PyObjC, it's my experience that PyObjC lets you build complex applications quickly, and wanted do a little bit to help make PyObjC more accessible to newcomers, whether they are newcomers to PyObjC or new to Cocoa development in general. This tutorial is my attempt to provide a comprehensive walkthrough to creating an application with PyObjC in XCode 3.0 and InterfaceBuilder 3.0, and to help you get to know this excellent tool.
Lets get started.
Our Project
Starting from a blank slate, it can be intimidating to get started with PyObjC. However, once you complete this tutorial you should be ready to dive into PyObjC projects of your own. We'll be building a desktop application that will display data retrieved from freebase.com using metaweb.py 1.
We'll have a textfield that allows users to specify their searches, and a table that will display the formatted results. We'll use an NSArrayController to greatly simplify our code (don't worry if NSArrayController doesn't mean anything to you, it'll be explained later in the tutorial). We'll also look at writing and reading files from the application's support directory (the directory where OS X coding guidelines ask you to store temporary and saved data for your application). Finally, the last step will be to look at programatically creating new windows in the application using a second nib (nibs will be explained later as well).
We'll touch on a wide range of issues, problems and solutions you'll run into when using PyObjC to develop real programs, without making any assumptions about existing knowledge of Cocoa, XCode or PyObjC. If you know simple Python, then you're ready to get started.
Two Principles to Remember
When just starting out with PyObjC there are a couple things that will help you get moving in the right direction:
PyObjC is Python. PyObjC is Objective-C, too. People getting started with Django often have trouble doing things and ask questions like "How do I read in a file from disk?" or "How can I do threading?" A frequent community answer is Django is Python. When working with PyObjC, too, thats an important answer to keep in mind.
Anything you can do in Python, you can do in PyObjC. If there is a great Python library to help power your app, use it! If you need to do some metaprogramming magic to simplify your program's logic, use it!
Equally important is the second half of the principle: PyObjC is Objective-C. This is particularly important for Objective-C programmers who are more familiar with the Cocoa libraries than with Python libraries: you get to pick and choose from both. Do you want to use
NSTimerto handle a recurring event? No problem. What about using an Obj-Cselectoror CoreData? Easy as slightly undercooked pie.Convert from Python to ObjC by replacing
:with_. When working with PyObjC you'll be converting ObjC methods into Pythonic form a lot. This is a simple two step process. First, replace all semicolons (:) with underscores (_), and then add the arguments into the method definition like you normally would in Python.Lets try a few examples of how that is done. First, we'll start with a short one. This method definition in Objective-C:
-(int)add: (int)a and: (int)b;
Becomes this code in Python:
def add_and_(self,a,b):
    # implementation here
For our second conversion lets try something a bit longer.
- (NSImage *)dragImageForRowsWithIndexes:(NSIndexSet *)dragRows
                            tableColumns:(NSArray *)tableColumns
                                   event:(NSEvent *)dragEvent
                                  offset:(NSPointPointer)dragImageOffset
Is translated into Python as:
def dragImageForRowsWithIndexes_tableColumns_event_offset_(self,dragRows,tableColumns,dragEvent,dragImageOffset):
    pass
Well, you can see that this conversion can lead to some pretty ugly method names, but its simple enough to perform. Actually, XCode knows how to autocomplete method names for PyObjC, so you won't even need to do the conversions yourself unless its a method from a class that you've defined.
Cocoa Pieces & Patterns
As we get started, there are a few important ideas that reoccur in Cocoa we need to look at briefly. (Are you already familiar with Cocoa development? You should skip down to Starting the Project.)
Every application you make is an instance of
NSApplication(or a subclass ofNSApplication).NSApplicationhas a delegate. Delegates are a pattern that occurs frequently in Cocoa, and allows you to customize and control behavior without subclassing the specific class (i.e. control anNSTableViewwithout subclassingNSTableView).For example, the
NSApplicationdelegate allows you to specify code to run when the application launches, handle opening the application with a specific file, and specify code to run before the application terminates. One of the first things we'll do is modify our application's delegate, so we'll talk more about that in a bit.Each user on an OS X system has a folder at
~/Library/Application Support/. Inside that folder, an application is allowed to create a folder to store data and settings. For example, Colloquy has a folder at~/Library/Application Support/Colloquy/.You should always store user specific data there, and not inside the application itself (which is both tempting and possible, since
.appapplications are really folders, but interferes with the 'just drag it into the Application folder' distribution method for applications).Cocoa classes frequently use the Model/View/Controller division of responsibilities, and your classes should too. Models contain data, views present data, and controllers handle interactions between the two. In smaller applications, however, it doesn't always pay to be religious about following MVC; brevity should not be considered a design flaw.
If you have played with Cocoa you know that many classes start with
NS. For example,NSTableView,NSWorkspaceandNSButton. Objective-C only has one namespace, and thus we create namespaces by prefixing letters.Many people use their (or their company's) initials for their prefix. At times I use
WLas my prefix, but at other times I use a subset of the application's name. For example I was working on a lesson planner named StrictlyEducation, and I usedSEas its prefix2.InterfaceBuilder makes creating GUIs very easy, and stores those interfaces in
.niband.xibfiles (.nibis usually used for pre-Leopard interfaces, and.xibfor projects created in Leopard). We'll look more at these later, but for now its enough to remember they contain GUI configurations.
Starting The Project
Now that we've fleshed out our background knowledge, time to start building our project.
Open XCode (you'll need to have installed it off of your OS X 10.5 install dvd).
Go up to the File menu and select the first option: New Project (or use Shift-Apple-n).
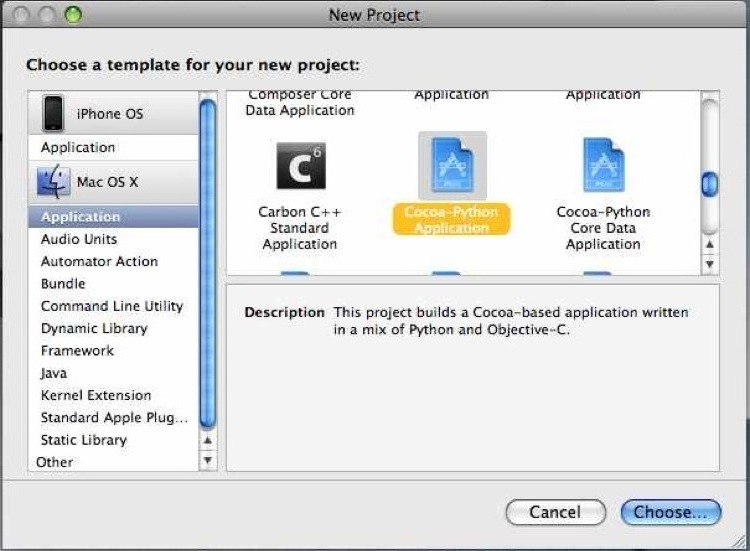
Select a Cocoa-Python Application and then hit Choose....
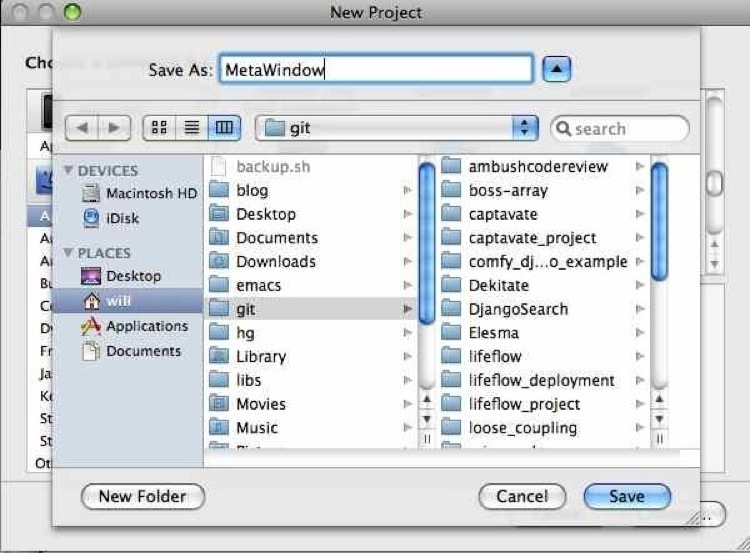
Name our new application MetaWindow, set the path to somewhere reasonable (I like to create mine in my ~/git/ directory), and then click Save.
Now that our project has been created this is the perfect time to put it under version control. I prefer Git, but you won't regret using Mercurial or even SVN. Just use something.
In a sense this is an optional step, but it really should be an ingrained habit. If it isn't, now is the best time to start. Sometimes you're going to screw things up, and you won't remember what you did or how to fix it. Version control transforms that event from a catastrophe into a quick check of the documentation to remember the syntax for merging.
Stuff in A Default Project
Now that you've created the project, there are already a bunch of files in it. Lets take a few moments to figure out what all this stuff is.
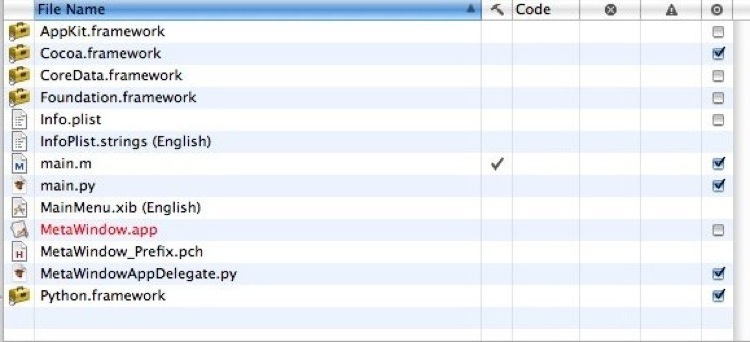
First, there are a number of
.frameworkfiles here.AppKit,Cocoa,CoreData,FoundationandPython. These are helpful libraries that are being linked to your application when you compile.Next there are
main.mandmain.py. They are the core application files, and you won't be touching them often (MetaWindow_Prefix.pchis like that, but even more so: you won't ever touch it). The one exception is that you'll need to add a simple Python import tomain.pyfor Python files in your app. For example, it currently has this line:import MetaWindowAppDelegate
If you created another file named
MWModel.py(MWare the initials for MetaWindow, the application, and is the namespace we'll be using for this app) , then you'd need to expand that part ofmain.pyto look like this:import MetaWindowAppDelegate import MWModel
MainWindow.xib (English)is an InterfaceBuilder file, and contains data about the application's interface.Info.plistcontains settings for the application, andInfoPlist.strings (English)is an internationalization file, which is used for supporting applications with locale specific labels and menus.MetaWindowAppDelegate.pyis a normal Python file, which contains the class for our application's delegate.MetaWindow.appis our application's shell. When you build the application everything will be stuffed inside of it, but at the moment it's just an inanimate skeleton.
Teaching Our Delegate Some Tricks.
The first thing we're going to do is flesh out MetaWindowAppDelegate.py. Go ahead and double click on it to open it. Right now it only contains a few lines:
from Foundation import *
from AppKit import *
class MetaWindowAppDelegate(NSObject):
def applicationDidFinishLaunching_(self, sender):
NSLog("Application did finish launching.")
But we're going to add a few helpful methods. First we're going to add a stub for doing something just before the application closes.
def applicationWillTerminate_(self,sender):
    NSLog("Application will terminate.")
This method, applicationWillTerminate_, is really helpful for saving data.
You've probably noticed that we're using NSLog() a lot. Its the most convenient way to log data and send yourself messages. While running the program you can see those messages in XCode's console window, and also by using Console.app.
Next, we'll add two methods to make it easy to access and create files in the application's support folder. applicationSupportFolder will return the path to MetaWindow's application support folder, and pathForFilename will return the path to a filename inside the application's support folder.
def applicationSupportFolder(self):
    paths = NSSearchPathForDirectoriesInDomains(NSApplicationSupportDirectory,NSUserDomainMask,True)
    basePath = (len(paths) > 0 and paths[0]) or NSTemporaryDirectory()
    fullPath = basePath.stringByAppendingPathComponent_("MetaWindow")
    if not os.path.exists(fullPath):
        os.mkdir(fullPath)
    return fullPath
def pathForFilename(self,filename):
return self.applicationSupportFolder().stringByAppendingPathComponent_(filename)
Finally, a quick mention about why the app delegate is a great tool. You can easily access and use your application delegate from anywhere within your code:
app_delegate = NSApplication.sharedApplication().delegate()
my_database = app_delegate.pathForFilename("db.sqlite")
This makes it a great place for utility methods. (By the way, this would be a great time to add a commit to your version control.)
Stubbing Out a New File
Next we're going to create a new file which we'll use to manage the user interface components for our app. Go up to the File menu and click New File... (Apple-N).
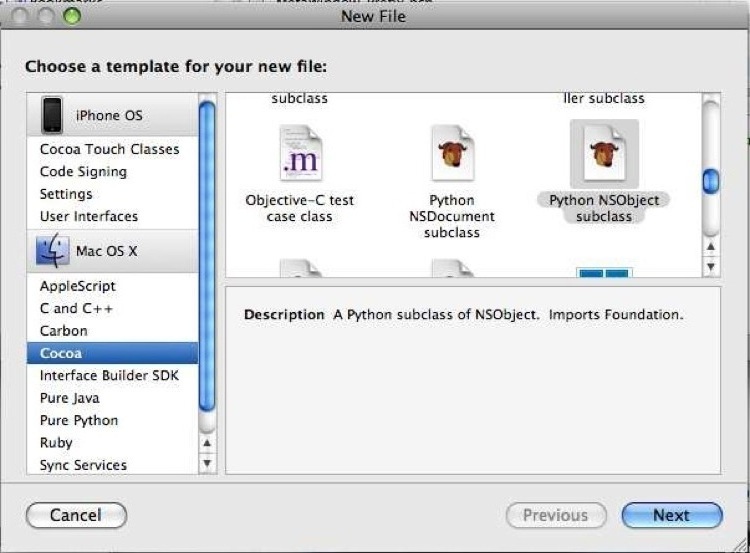
Select Python NSObject subclass and then click next. Name it MWController.py and then click Finish.
Open up MWController.py and it'll look like this:
from Foundation import *
class MWController(NSObject):
pass
Modify the imports to look like this:
import objc
from Foundation import *
The objc module provides access to a number of important utilities for creating PyObjC applications. Here we're going to take advantage of two of them: the @objc.IBAction decorator, and the objc.IBOutlet() function.
You must apply the @objc.IBAction decorator to any method that you want to be accessible in InterfaceBuilder. This means that anything you'll want a user interface component to activate (perhaps a wasClicked_ method called after a button is clicked, etc) should be decorated with @objc.IBAction. Beware, though, that all such actions must have at least one argument (and thus one underscore in their Python definition). For example you must write def myFunc_(self,sender) instead of def myFunc(self). The value of sender is supplied by Cocoa and will be the button (or instance of another class) that calls the action.
In the same trend, objc.IBOutlet() allows you to connect together models in a .xib file. This concept is difficult to understand before you've used the InterfaceBuilder, so we'll look at this in more depth later.
Now lets add a couple fields to the MWController class.
class MWController(NSObject):
    tableView = objc.IBOutlet()
    textField = objc.IBOutlet()
    results = []
And we'll add a stub method.
@objc.IBAction
def search_(self,sender):
    search_value = self.textField.stringValue()
    NSLog(u"Search: %s" % search_value)
As mentioned before, the search_ method will be called by a UI component, so it needs the @objc.IBAction decorator, and also must take the argument sender.
Finally, the last step to adding a Python file to an XCode project is to open up main.py and import the file under this line:
# import modules containing classes required to start application and load MainMenu.nib
Adding MWController, that portion of main.py will look like this:
# import modules containing classes required to start application and load MainMenu.nib
import MetaWindowAppDelegate
import MWController
Go ahead and save main.py and MWController.py. Next we'll setup MainMenu.xib.
Set Us Up The Xib
We're going to work with InterfaceBuilder now. IB is a really excellent tool for visually creating graphical user interfaces, but it also has a bit of a learning curve. You're probably going to be confused at some point. The first time I used IB I nearly gave up and was a hair away from abandoning the idea of developing for OS X. These days it's more like a treasured friend. You just need to give yourself some time to get used to it.
In the Groups & Files panel in the XCode project, click the arrow beside the Resources folder. Now double click on MainMenu.xib to open it.
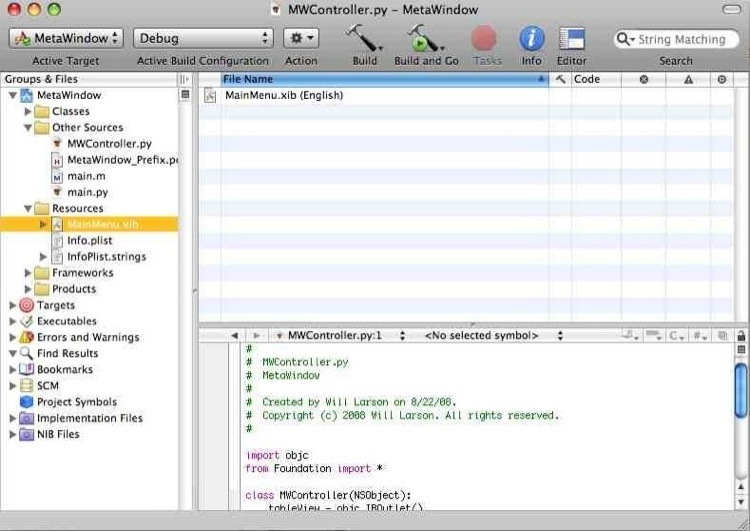
Now you'll see three windows:
MainMenu.xib (English)contains references to all the objects in your.xibfile. You can click on any of those and then open the Inspector (Toolmenu, thenInspector, or Shift-Apple-i) to modify their details. You can also click on some of them (likeMainMenuorWindow (Window)) to make that item front and key.Window (Window)represents the main window for the application, which will pop up when you run the application. We'll be adding some items to it momentarily.Librarycontains all the widgets and objects you can use for creating your user interface.
The first thing we want to do is add an NSTableView to our Window (Window) window (as long as Major Major Major approves). Go to the Library window and look around for it, and then drag it into Window (Window).
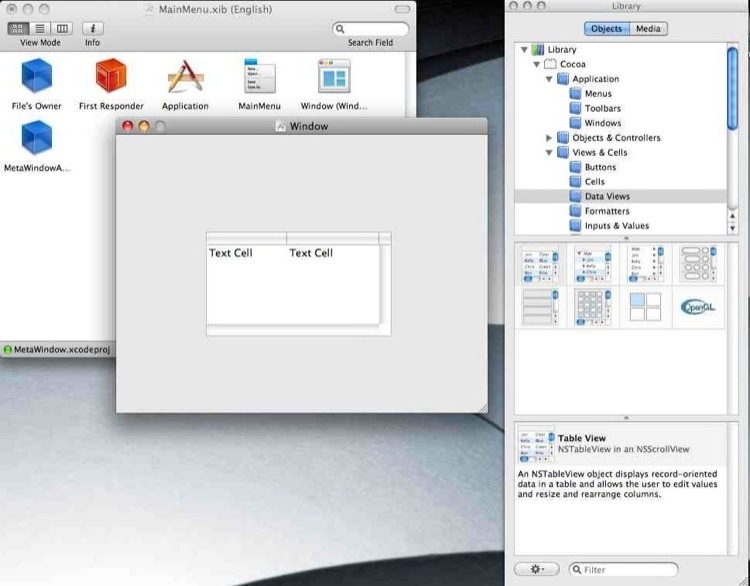
Next drag an NSTextField and an NSButton to Window (Window) as well.
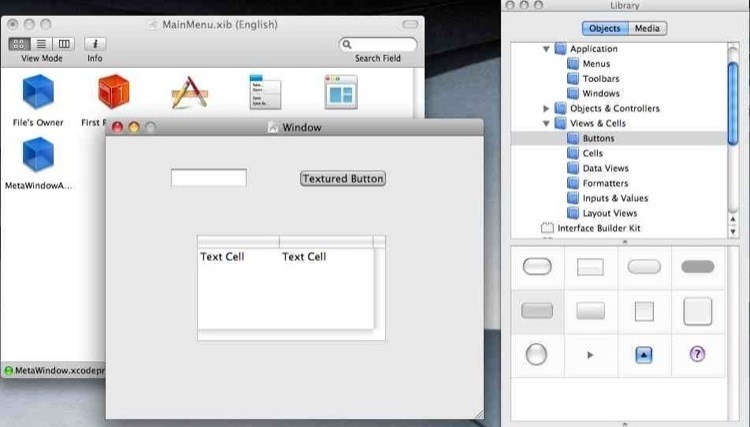
Now we need to resize the tableView, textField and button. To resize them, hover your cursor over the side you want to adjust and drag the corner or edge. Occasionally you'll notice dotted blue lines appearing in the window. Those help you follow Apple's Human Interface Guidlines, and also help you align objects with each other. Go ahead and rearrange everything to look like this:
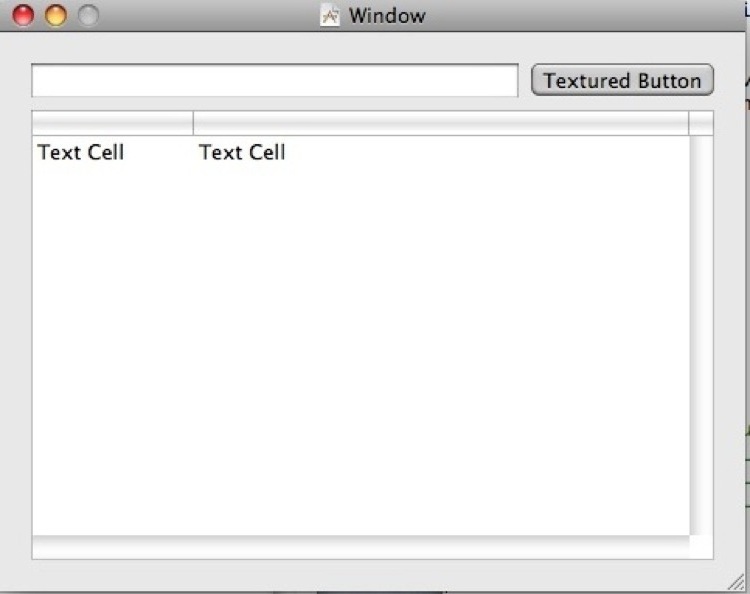
Double click on the button and rename it as Search.
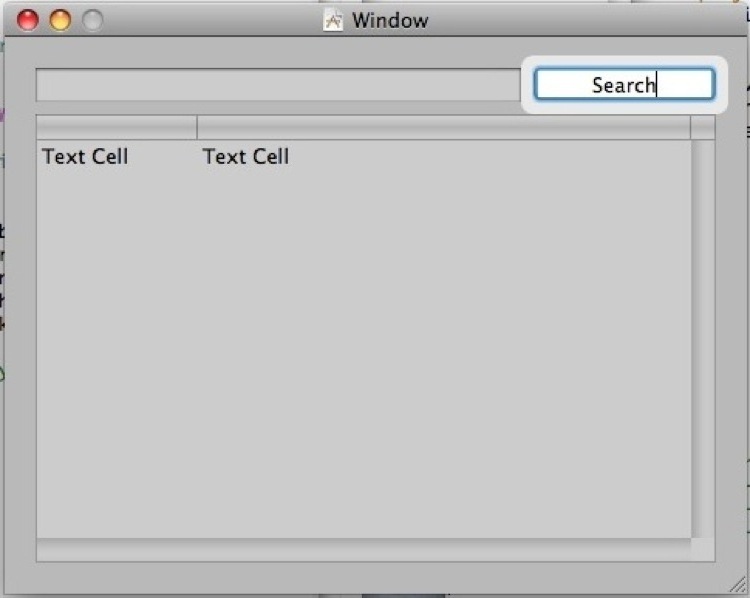
Now we're going to setup the autosizing logic for the three items. To do this, first open the Inspector (Tool->Inspector or Shift-Apple-i), then click on the tableView, and select the third tab in the inspector.
In the Inspector's third tab, you'll see a portion labeled Autosizing with two components: on the left is a box with struts and arrows, and on the right is a box that keeps changing sizes. In the left box click so that there are six red items: a strut at the top,left,bottom and right of the box, and double-headed arrows going both vertical and horizontal within the box.
It should look like this:
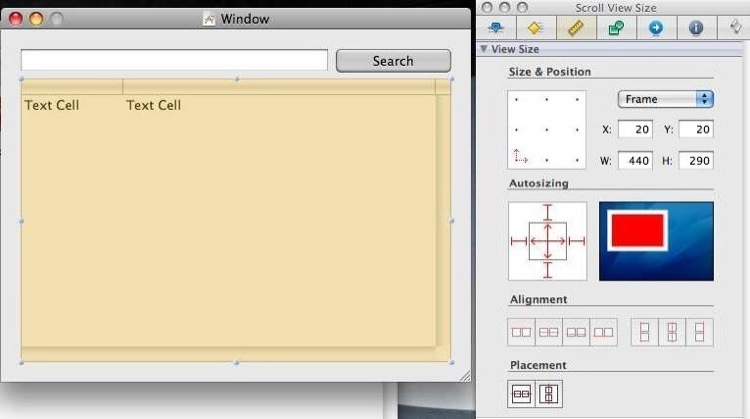
Now click on the textField. It should have the horizontal double-headed arrow, and the top,left, and right struts. The button should have the top and right struts, but no double-headed arrows.
The combinations of what works and what doesn't can require some trial and error, and the easiest way to test is to go to the File menu, and then go to Simulate Interface (Apple-R). That allows you to resize the window and check that everything is working correctly. Go ahead and give it a whirl.
We're almost done messing with the xib file, so you can take a quick sigh of relief. Just one more little thing.
Adding a MWController to MainMenu.xib
Part of the utility of .xib and .nib files comes from their ability to store serialized instances of a class. If you you look at the MainMenu.xib window in InterfaceBuilder, there are already a number of serialized instances present: the cube labeled MetaWindowAppDelegate is one, and so is Application.
This is useful because it allows you to graphically connect objects together. For example, click on Application and go to the fifth tab in the Inspector. There you can see that it has an outlet named delegate which has been connected to MetaWindowAppDelegate.
Now we want to create an instance of MWController and set up its outlets (and an action as well).
Go to the Library window and in the search field at the bottom type in NSObject (make sure you are selecting the Library folder in the outline view in the same window, or you may not find NSObject with your search).
Drag the NSObject icon over into your MainMenu.xib window. A new cube named Object should appear.
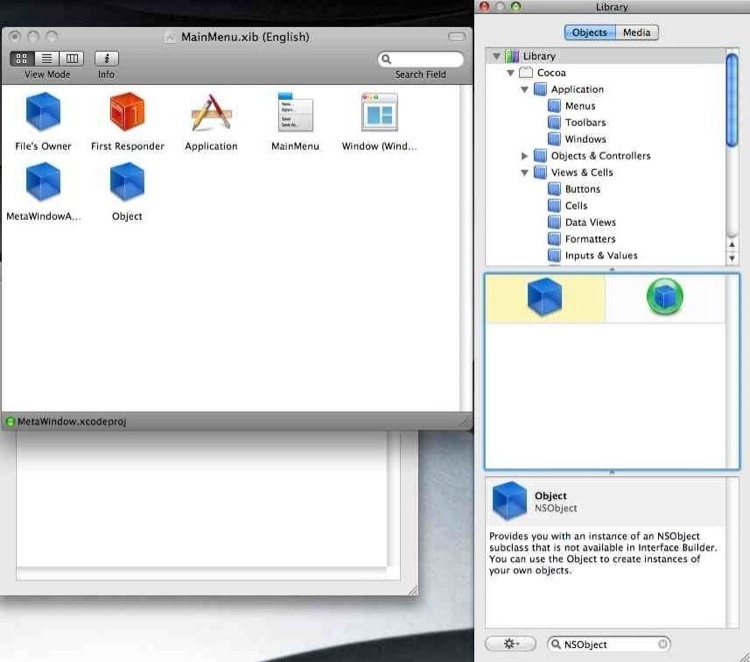
Click on Object and go to the sixth tab in the Inspector (the tab is named Object Identity). In the top text field, whose label is Class replace NSObject with MWController and hit enter.
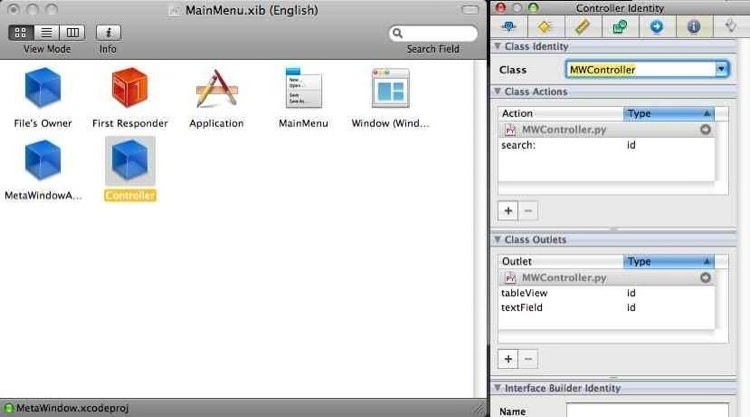
Now go back to the MainMenu.xib window and click on Controller (it's the object that was named Object just a few moments ago). Also get the window named Window in view so that you can see its tableView and textField.
Press and hold down the control key and drag--starting at Controller-- to the textField in Window. A little heads-up-display box will popup and ask you to select between textField and tableView; choose textField.
Do the same thing again, starting dragging at Controller and this time releasing on top of the tableView. When the popup appears select tableView.
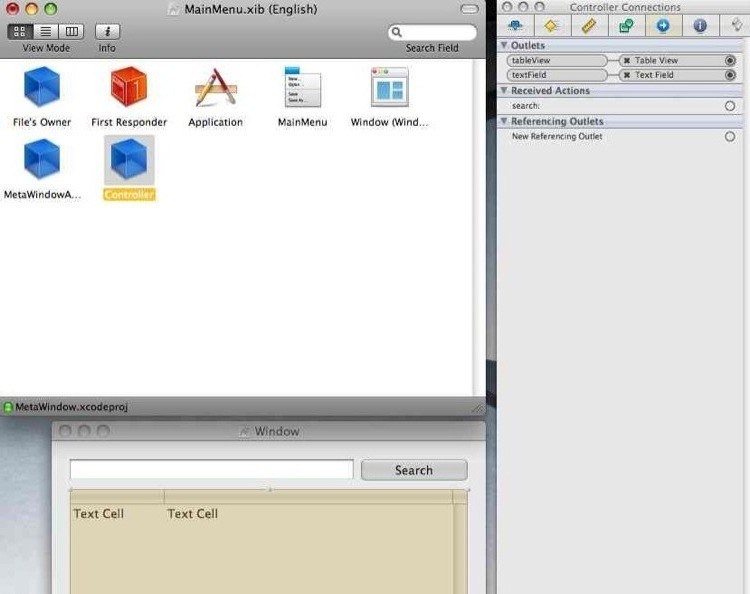
The last connection we're going to make will be from the Search button to Controller. For assigning actions you start with the input (here, the button) and drag to the object whose action you want to call (here, Controller).
Select the Search button and start holding control. Drag from the button to Controller and then release. A little black box with only one option, search:, will appear; select that option.
Save. Close InterfaceBuilder. Congratulate yourself for surviving.
Building And Verify
The last step in this first segment is to build our application and verify that what we have so far is working. To do that, go back to XCode and click on Build and Go (or go to the Build menu then Build and Go, or just use Apple-Return).
After a few seconds it will open open the window with our app. Huzzah.
Now--with the app still running--go back to XCode and click on the small icon that says gdb on it (or Shift-Apple-R). That will launch the debugging console for the app. With the console in sight, type something into the textField in the app, and then click the Search button.
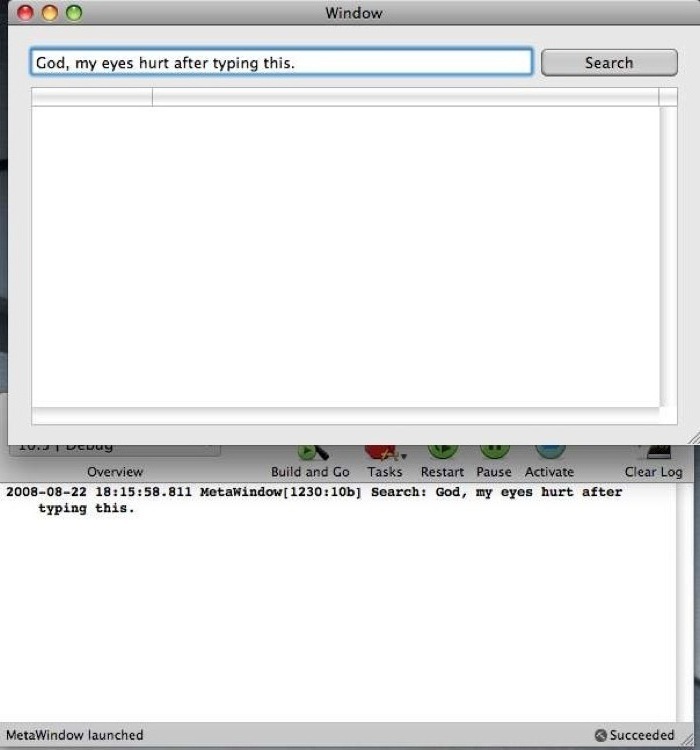
We've successfully stubbed out our application. It doesn't do a whole lot yet, but we've covered a tremendous amount of material, and we have established a solid foundation to keep building on as we go.
Ending Part One
This concludes the first segment of this tutorial. You can continue on with the second segment here. You can download the current state of the project here. There is also a GitHub repository, which is the recommended way of accessing the code.
Have I made any grave mistakes? Thoughts about how to improve on things thus far? Ideas for additional topics to cover? Leave a comment!
Freebase is a website similar to Wikipedia that provides easy access to structured data under several open licenses. Its pretty impressive, and well worth a few minutes of your time to check out.↩
StrictlyEducation was my first extended project in pure Objective-C, taught me a tremendous amount about ObjC, and eventually sank into non-development when I felt like the market for such software would be non-existent.↩